When is it best to use pigment ink and when is it best to use dye ink? Find out the answer along with even more helpful tips to make your stamped images perfect for the occasion!
Pigment inks are new to this Idea Book and come in packages of 10. There are 4 different packages Whimsy, Adventure, Enchantment, and Basics, . There is so much that you can do with them. They are wonderful for all your home decor projects...the pigment inks do not fade nearly as much as do dye inks in direct sunlight. Try some today...let me know if you would like to learn more about different uses for these inks.
Have a great day! Lucy :)
Tuesday, November 13, 2012
Monday, November 12, 2012
Cricut Cards and Envelopes
Discover how to create cards, envelopes, and more with the Cricut® Artiste cartridge. Move beyond flat cut-outs for more creative freedom!
I love my Artiste cartidge and all that it can cut for me in the way of cards. There are a large variety of different styles and types on this cartridge. My cartridge has hardly left my machine since I got it and I have barely scratched the surface with all that you can create with the help of this handy dandy cartridge. To order one of your own cartridges click here. Have fun creating! I hope this video helps to get your creativity going!
Have a great day, Lucy:)
Tuesday, November 6, 2012
Thanks!
This card is one that came together so easily for me . I had all the parts from other projects and experiments with the Cricut Artiste cartridge and all the pieces were sitting there begging to be used. So...long story short, add a bit of ink and a sentiment, and some natural hemp and this card was made.

I love the Pear and Partridge paper and the Saddle/Ruby cardstock colour combination together. Although Pear and Partridge is a Christmas paper pack it works very nicely as background paper for other purposes too.
The flower rather reminds me of the poppies that are worn in November. I am thankful that I live in a great and glorious country and that we have so many men and women who have fought valiantly for our freedom. So on November 11th (Remembrance Day) I will pause and remember those who fought for us and for me! Above all I will thank God that we live in a country that is still free and that we are free to live our lives serving Him!
Have a great day, Lucy :)
Tuesday, October 23, 2012
Avonlea Display Tray
This display tray of my late mother-in-love uses Avonlea. Avonlea is such a beautiful paper line for anything heritage. One of the papers even has a family tree on it and I love that. I used a bit of that particular paper in the first box of the second row to help us remember some of the history of Mom's life. Pictures of various phases of her life also are included in the display.

One thing that I love about this display box is the depth of the cubbies. You can add dimensional elements to each compartmet and it will look beautiful. That is what I did with some of the roses and leaves that you can cut with the Cricut Artiste Cartridge. I also used some of the resin roses and the brads that come in the Slate Mini Medleys. A few pearls from the licorice opaques finish this setting off. A small picture may be added to this box later, but I haven't found the one that is just right yet.

The other thing that I did that I thought was great to add extra dimension and surprise was to add a flip-flap to the second one on the bottom right side and it will flip up to display some of my mother in law's favourite pieces of jewellry. I don't want it in full view all the time, so the flip flap was my solution to that. I have not put the jewelry in there yet so I will not show you a close-up of that yet.
Other items that were used to make this display were the
Avonlea Complements Canvas Shapes, Brocade Assortment, and the Parlour Velvet Rub-Ons, and to finish off this project I made a bow from Slate Satin Polka Dot Ribbon.
This tray is going to have a special place in our home. I love how it turned out. I hope you like it too.
Have a wonderful day, Lucy :)
Wednesday, October 17, 2012
Clearly the Best Video: Alcohol Marker Madness
Close to my Heart has come out with new markers that are alcohol -based and they are wonderful. They are sure to be markers that you will go to over and over again to brighten images, pages, and projects. Watch this video to find out what I mean.
To get the supplies that are used in this video go to my website: www.lucyimrie.ctmh.com .
Have a wonderful day, Lucy :)
Tuesday, October 16, 2012
My Creations Star
The moment that I saw this star in the new Idea Book, I knew I wanted to make one. Initially I thought that I would do one with the Dakota paper (my favourite paper) but as the ideas started to percolate in my head, I leaned more and more to the La Belle Vie paper. So instead of the countryish theme that I first thought, it became more and more a feminine theme...flowers, glitter gel and prisma glitter to give it that special femininity. I used smokey plum ink to color all the edges of the star (somehow it looks a little brighter in the pictures than it is in actuality) and then the desert sand patterned paper as the base of the star. Flowers (from the black/pink patterned paper) cut from our new Artiste cartridge grace the one point of the star, while on another point the word "welcome" from the Black Glamour Alphabet stickers is the focal point. I was very pleased with the outcome of this project and very soon it will be hanging on the wall in the front entrance of our home.

The star.

Closeup of the flowers, leaves and butterfly.

Closeup of "Welcome"
Well that is it for today. I hope you enjoy your day!
Lucy :)
Monday, October 15, 2012
Oshawa's Scrapfest and a Card
I have been rather busy for the few weeks planning for Scrapfest in Oshawa. Many plans were set in motion and executed and the event went off very well. I think that this weekend was so much fun and other than the rain that hit as we were packing up it was a great two days. I met many people there, so many of you introduced yourselves to me as CTMH consultants and that I loved. I enjoyed meeting my fellow creative sisters there. I met so many creative scrappers there and had a wonderful time chatting with you all. Business was good too. A shoutout goes to my friend Lynne, who as usual is my partner in crime and did a wonderful job with the Create and Take - a little Timmy's box with a chocolate in it for anyone who wanted to make one. That brought a lot of positive exposure to our Artiste Cartridge. Yay! Also a big thanks to Alyson for helping in the booth...your help was appreciated. Thanks to all who stopped by at the booth... you made this event well worth its while!
Here is one of the cards that I made to be able to display at Scrapfest. I used the Pirouette stamp set, white daisy pigment ink, clear embossing powder, images from our new Artiste cartridge, hemp, Ruby, Saddle, Cashmere and Champagne cardstock, Saddle and Cashmere ink and some sparkles to create this card. I hope you enjoy it! I love how it turned out.

Here is one of the cards that I made to be able to display at Scrapfest. I used the Pirouette stamp set, white daisy pigment ink, clear embossing powder, images from our new Artiste cartridge, hemp, Ruby, Saddle, Cashmere and Champagne cardstock, Saddle and Cashmere ink and some sparkles to create this card. I hope you enjoy it! I love how it turned out.

That is all for today. Enjoy your day! Lucy :)
Tuesday, October 9, 2012
Bracket Frame
I had so much fun with this frame...creating a beautiful piece of home decor. Using some techniques that I gleaned from Tamra Pope's blog I created this bracket frame.

I used the Pear and Partridge paper pack from Close to my Heart and also used a lot of cardstock. I also used the Cricut Artiste cartridge (available through me) to cut the floral pieces. I cut the flowers various sizes, ranging in size from 1/2" to 2 3/4" and then let the magic begin. Use a mouse pad and the rounded end of your paper piercer or dry embosser and press the flower using circular action. The flower will begin to change and become a 3-D flower. Do this with all of the pieces and then glue them together in the centres only, making sure that you alternate the petals. You will end up with a very pretty flower that almost resembles a cabbage flower. Cut the leaves with the cartridge and shape them with the embossing tool.
For the pine cones, I cut a rose from the Art Philosophy cartridge (also available through me) and then rolled it up, but instead of forming it into a rose I left it up higher and glued it with Liquid Glass. I spread some Liquid Applique on the cones, making a snow effect.
The final touch came in adding some brown sparkles to the flowers.
I am also adding some close up photos of the flower work.


I hope you enjoy this. Make sure that you try this for yourself. It is a lot of fun to see paper become more 3 dimensional.
P.S. if you want more detailed info as to how to do this tecnique go to Tamra Pope's blog: http://tamrascraftypapercreations.blogspot.ca/2012/08/christmas-wreath-and-poinsettia-flower.html
She explains it so well - why re-invent the wheel?
Have a great day! Lucy :)
Wednesday, October 3, 2012
Rosette Wreath
Pear and Partridge is one of my favourite paper packs in this idea book. I can imagine ever so many projects to do with this paper. But to have the time...that is the issue. I spent a fair bit of time in the last couple days to create this wreath. I combined paper from two other paper packs...the green from Moonlight and the red one from Stella. They bring a beautiful mix to the wreath and I like the end result. To make this wreath I made a whole lot of rosettes made from strips of paper ranging in width from 3/4" to 2". I also used a lot of clear sparkles to bring some bling and shine to the wreath. A burlap bow finished the wreath off. I am pretty pleased how this project turned out.

The full wreath.

Close up of one of the rosettes (the Colonial white one) that I cut with the Artiste Cartridge at 2"

Yet another closeup. This one is cut at 1 1/2".
I went through about 6 glue sticks to put this project all together. You may see a few threads of glue in the picture. Sorry I did not notice them until I saw it in the pictures.
I hope you enjoy this wreath.
Have a wonderful day! Lucy :)
Monday, September 24, 2012
Bend It, Curve It, Stamp It!
Do you want to be able to get more out of your stamps? Watch this video to see how you can use your stamps in ways that will make them look a lot different than they are on the carrier sheet. Then get creative and make your projects shine in a new way!
http://www.youtube.com/watch?v=iseHjwJRnrU&feature=player_embedded
Have fun! and have a great day. Lucy :)
http://www.youtube.com/watch?v=iseHjwJRnrU&feature=player_embedded
Have fun! and have a great day. Lucy :)
Wednesday, September 19, 2012
Adding Colour to your Crafts
Tired of using the same colors in your scrapbook pages? We have a palette of 40 colors that boast paper,ink, markers, and pigment inks. They come in 4 new color families and are simple, easy and beautiful to use. Add some color and spruce up your designs using our colours and our kit-exclusive paper packs. Take a few minutes and watch this video.
http://youtu.be/uS6c6iLzTgU
Would you like to order any of these products? Go herewww.lucyimrie.ctmh.com and shop with me.
Have a wonderful day, Lucy :)
http://youtu.be/uS6c6iLzTgU
Would you like to order any of these products? Go herewww.lucyimrie.ctmh.com and shop with me.
Have a wonderful day, Lucy :)
Monday, September 17, 2012
Swipe and Stamp
I love this technique! I have used it in various ways before, but not quite like this. Watch this video and be inspired. Get a new look with some of your favourite stamps and put a fresh look on some of your artwork by trying this technique. Watch this and then go have some fun.... I dare you... and then post some of that artwork. Have a wonderful day... blessings, Lucy :)
http://youtu.be/Bq9DJKSSw44
http://youtu.be/Bq9DJKSSw44
Wednesday, August 1, 2012
IT"S HERE!!!


The new Autumn/Winter Idea book is now live. As of today you can shop from the idea book or my website www.lucyimrie.ctmh.com .
It is jam packed with new product including 8 new paper packs and even more Workshops on the Go. 
'Avonlea' is a great paper for heritage and family pictures.

'Dakota' is a more masculine paper line, boasting lots of country flair.

'Clementine' has lots of the new browns and sorbet, a feminine cowgirl feel. Great for those girly layouts and yet good for boys too.

'Flirty' is a very bright and funky paper line. Using new Flirty Raspberry, Flirty Yellow, Goldrush and New England Ivy as its main colors it is bold and fun. Great paper for cheeriness. Teenagers will gravitate to this line.

'La Belle Vie' has a very French feel to it. Romance, travel...this will be a go to paper for weddings and anniversaries, love, etc. But it will appeal to the European traveller too.

'Moonlight' features black, Goldrush, Slate and Smokey Plum in its color palette. It will be the go to paper for all things Halloween. It is also great for Thanksgiving and fall related themes. This paper also works well for masculine pages and cards.

'Pear and Partridge' features the new Cashmere color as well as olive, cranberry and desert sand in its palette. This paper is great for all things Christmas and will work very well with some of the new home decor items that we are now carrying.
There are so many new accessories and stamp sets too.
I am having a open house on August 9th at 7:00pm. Come see the new products and create something while you are here. Bring a friend with you, too.
Take a look at my website to find all the new items that we are now carrying. Have fun treasure hunting.
Have a great day, Lucy
Tuesday, July 31, 2012
Project Inspiration 2012 Autumn/Winter Idea Book: Stepping Up Your Stamping
Watch this video clip to give you more ideas for using the stamp sets that come in the Workshop on the Go kits in the Autumn/Winter Idea Book. Need some additional help? Please don't hesitate to get in touch with me. Today is the last day for the Spring/Summer Idea Book; tomorrow the Autumn/Winter Idea Book goes live. There are some really neat new products in there that I am so excited to show all of you. Until then, have a wonderful day!
Lucy:)
Friday, July 27, 2012
Project Inspiration 2012 Autumn/Winter Idea Book: Home Decor
Watch this video clip to see some of our new decor items that are in the Fall/ Winter Idea Book. They are just great and would make a wonderful addition to any home. Contact me to order these items or go to my website: www.lucyimrie.ctmh.com
Friday, March 30, 2012
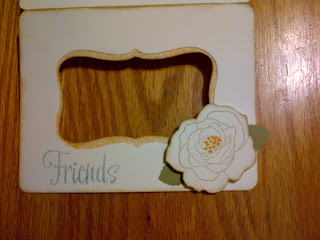
Another 'Beautiful Friendship' Card

This is another take on the "Beautiful Friendship" stamp set. For this card I used the 'Lucy' paper (my favourite ---I wonder why??), Colonial white Cardstock, Smoothie ribbon and ink, Sunflower ink, Sweet leaf ink, and Grey wool ink. I did a sanding technique on the front medallion, before stamping on the word 'Friends', then added three AP roses to the front. All were touched with a few drops of Glitter Glue and a mocha pearl opaque in the centre. A tendril of mini pearl opaques finishes off the front.

The inside of the card was done with 2nd generation sweet leaf ink and grey wool.

Tuesday, March 27, 2012
Card using Pemberley, Card Word Puzzle and Beautiful Friendship
I made this card for our team meeting last night. I started out to do something totally different and this is what evolved from that process. I was quite happy with the results, and love what you can do with markers and the water pen.


I used the CTMH Art Philosophy cartridge to create the base and the yellow layer of the card. The base was cut at 5.5" - rectangle 8 and the layer was cut at 2.5" - rectangle 8 as well.

The flower is from the Card Word Puzzle and is stamped on Colonial White cardstock with Desert Sand Ink. The centre of the flower is done with CTMH's Liquid Applique mixed with a drop of Sunflower Re-Inker and dabbed onto the stamens with a toothpick. The heatgun makes it all puffy and look like real stamens.

The flowers(from Card Word Puzzle) inside the card are done with markers - Vanilla Cream, Crystal Blue, Twilight and Olive, I used the water pen to give them a watercolour look. It helps to blend the colours and give the flowers a much softer look. You could also use the blending pen and ink pads to get somewhat the same look, but I like to try different tools to get the look I am after.
The sentiments are from the Beautiful Friendship stamp set.
That is my art for today. I hope you enjoy it. Have a great day and be sure to include a chat with a friend to make it a beautiful day!!!
Subscribe to:
Posts (Atom)