Pull out your Cricut® Artbooking cartridge for some holiday hullabaloo on your Christmas layouts! Its themed borders, overlays, photo mats, and more hold plenty of cheery possibilities to brighten your albums. Trim your trims, ornament your ornaments, and have a holly jolly time making Christmas layouts that last—all with just two keys!(words from CTMH)
Enjoy this video. I hope it inspires you to create some of your own artwork this Christmas season! I know that it is helping me to create some of my Christmas pages...hoping to have some ready for my family Christmas when I get to see my great nieces and nephew and enjoy their excitement of Christmas. Have a great Christmas!
Thursday, December 12, 2013
Tuesday, December 10, 2013
Artbooking Made Easy: Wintertime Layouts
Let a few frosty images from the 2 winter-themed keys of the Cricut® Artbooking cartridge fall into place on your layouts to give them a little sparkle! Now is the time to pull out your photos of sledding sensations and tasty creations and match them with heaps of shapes, titles, borders, and overlays on your wintry projects. Watch the video to gather your own ideas for projects that will melt the heart.(Words from CTMH)
Hope you enjoyed this video. Make your own layouts and show me what you have done.
Enjoy your crafting time!!
Have a great week!
Hope you enjoyed this video. Make your own layouts and show me what you have done.
Enjoy your crafting time!!
Have a great week!
Tuesday, November 26, 2013
Creating for Christmas - the Brae-er's Team Blog Hop
Well Christmas is just less than a month away and with it comes some pretty busy schedules. So I am preparing most of my Christmas cards, decor, and even some food ahead of time. But I will let you in on a little secret...the fact that my son is leaving for New Zealand for 4 months on December 3rd has a lot to do with that. Christmas is coming early to our house this year, because we are going to celebrate before he goes. So some of the prep has begun already!!
If you have just hopped onto my blog, you can start here as this is a circular hop, If you came from Corina's blog then you are in the right place!
We are featuring some of the Holiday product that CTMH has done a fabulous job with. I love the Sparkle and Shine line and it is one of my favourite Christmas papers ever. Once I got some of that in my possession many inspirations began to swim around in my head. Some of it made it to the creating stage, some of it still has to get that far - but eventually it will get there.
Here are some of the projects that I have done over the last 2 months with this product line.
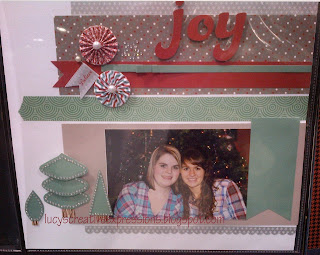 This is a one page layout using the Sparkle and Shine bulk paper and using the Sparkle and Shine Washi tape, the Sparkle Assortment (the cluster at the top left) as well as the Sparkle Holiday Shapes ( the nice blingy shapes that are supposed to be ornaments, but I turned them into trees).
The following card is one that was inspired by the talented Tamra Pope. I love her work and when I saw this card

I fell in love with the way she raised the snowflakes, so I took that idea and ran with it. This is the card that I came up with loosely based on her card. I used the wintry wishes stamp set, the silver washi tape and the Sparkle and Shine paper for the card.

The next card uses the Scandinavian Wishes stampset (October's SOTM), bit of Sparkle and Shine paper and the washi tape. Can you tell that I love washi tape? It is in every project in this post.

The last card that I am showing you also uses washi tape and a bit of the sparkle and shine paper. For this card I tore the ends of the paper and also the edges of the washi tape. The sentiment is from the triple stamp set that was part of a promotion run in September 2013. I wanted to show you that this washi tape and paper did not have to be limited to Christmas cards only. How about something like this for Valentine's day?
 That is all I have for today. There is more to come in another blog post. Hope you enjoyed these projects and that they inspire you in some of your own artwork.
Your next stop on the Team Brae-er Hop is Tamara's . Go see what great artwork she has to inspire us!
If you get lost along the way you can head to Brae's blog as she has the complete blog list.
We hope that you will take the time to leave comments on our posts, as we really love feedback from our blog viewers....whether it was something that you really liked or some new technique that was used that you would like to learn how to do....by leaving us comments, we get to hear what you like, and what you want to see.
Thanks for hopping along with us - we hope we were able to inspire you to get creative using some of the designs, products and techniques seen along the way. Join us again in December when we will be featuring ideas to make for Valentines/family day etc.
Have a great day!
Lucy :)
If you have just hopped onto my blog, you can start here as this is a circular hop, If you came from Corina's blog then you are in the right place!
We are featuring some of the Holiday product that CTMH has done a fabulous job with. I love the Sparkle and Shine line and it is one of my favourite Christmas papers ever. Once I got some of that in my possession many inspirations began to swim around in my head. Some of it made it to the creating stage, some of it still has to get that far - but eventually it will get there.
Here are some of the projects that I have done over the last 2 months with this product line.

The following card is one that was inspired by the talented Tamra Pope. I love her work and when I saw this card

I fell in love with the way she raised the snowflakes, so I took that idea and ran with it. This is the card that I came up with loosely based on her card. I used the wintry wishes stamp set, the silver washi tape and the Sparkle and Shine paper for the card.

The next card uses the Scandinavian Wishes stampset (October's SOTM), bit of Sparkle and Shine paper and the washi tape. Can you tell that I love washi tape? It is in every project in this post.

The last card that I am showing you also uses washi tape and a bit of the sparkle and shine paper. For this card I tore the ends of the paper and also the edges of the washi tape. The sentiment is from the triple stamp set that was part of a promotion run in September 2013. I wanted to show you that this washi tape and paper did not have to be limited to Christmas cards only. How about something like this for Valentine's day?

Your next stop on the Team Brae-er Hop is Tamara's . Go see what great artwork she has to inspire us!
If you get lost along the way you can head to Brae's blog as she has the complete blog list.
We hope that you will take the time to leave comments on our posts, as we really love feedback from our blog viewers....whether it was something that you really liked or some new technique that was used that you would like to learn how to do....by leaving us comments, we get to hear what you like, and what you want to see.
Thanks for hopping along with us - we hope we were able to inspire you to get creative using some of the designs, products and techniques seen along the way. Join us again in December when we will be featuring ideas to make for Valentines/family day etc.
Have a great day!
Lucy :)
Saturday, November 2, 2013
Artbooking Made Easy: Festive Mini Albums (S01E09)
If your photos from holidays past are haunting you by sitting untouched on your hard drive, now is the time to put them on display! With the Cricut® Artbooking cartridge, your photos will find a cozy home on the pages of a dazzling holiday mini album. In conjunction with the new Sparkle & Shine papers and embellishments, die-cuts from the Artbooking holiday-themed keys are just what you need to create merry and bright holiday projects.
http://www.youtube.com/v/j71AqK4pVxA?version=3&autohide=1&feature=share&showinfo=1&attribution_tag=fgIHrallG-B6jmBJDIXBQw&autohide=1&autoplay=1
Enjoy watching and be prepared to be inspired.
http://www.youtube.com/v/j71AqK4pVxA?version=3&autohide=1&feature=share&showinfo=1&attribution_tag=fgIHrallG-B6jmBJDIXBQw&autohide=1&autoplay=1
Enjoy watching and be prepared to be inspired.
Thursday, October 24, 2013
Artbooking Made Easy: Everyday Layouts (S01E08)
This is a video showing just how easy it is to make beautiful pages using the newest Cricut cartridge ;Artbooking' available exclusively through CTMH. Enjoy the video!
Wednesday, October 2, 2013
Give Thanks - The Brae-er's October Blog Hop
Welcome to our October Team Brae-er Blog Hop that focuses on "Giving Thanks" in anticipation of the Thanksgiving holiday. You will see creations from our team that may include stamp sets, patterned paper, inks, embellishments and more from the Close To My Heart Autumn Idea book.
We hope that you will take the time to leave comments on our posts, as we really love feedback from our blog viewers....whether it was something that you really liked or some new technique that was used that you would like to learn how to do....by leaving us comments we get to hear what you like, and what you want to see. Thank you… now on to our hop!
If you have just hopped onto my blog, you can start here as this is a circular hop. If you came from Michelle's blog of The Right Hugh then you are in the right place! I am sure she had some fabulous creative work to show you.
I love this time of year. Days are for the most part still beautiful and the nights are so much cooler - great for sleeping. But better yet, most of the garden produce has been gathered and in the fruit cellar or freezer waiting to be consumed this winter. The colors on the trees are a feast for the eyes...God has His paint brush loaded with some brilliant colors. Gratitude is the word I like the best for this time of year...God has once again blessed us abundantly.
I made a few cards to reflect those thoughts.


Your next stop on the Braer's Team Hop is Carol of "Crafty Carol's". I am sure that she will, as usual, have some fabulous artwork to share with you.
If you get lost along the way, you can head to Brae Montgomery's blog http://thebrae-er.blogspot.ca/2013/10/october-team-blog-hop-thankful-for-so, as she has the complete blog list.
Thanks for hopping along with us - we hope we were able to inspire you to get creative using some of the designs, products and techniques seen along the way. Join us again in November when we will be featuring gifts to make for the Holidays .
Enjoy your Thanksgiving holiday. I for one plan to and I am so thankful for living in a country like Canada where we can celebrate in such freedom!!
Lucy :)
We hope that you will take the time to leave comments on our posts, as we really love feedback from our blog viewers....whether it was something that you really liked or some new technique that was used that you would like to learn how to do....by leaving us comments we get to hear what you like, and what you want to see. Thank you… now on to our hop!
If you have just hopped onto my blog, you can start here as this is a circular hop. If you came from Michelle's blog of The Right Hugh then you are in the right place! I am sure she had some fabulous creative work to show you.
I love this time of year. Days are for the most part still beautiful and the nights are so much cooler - great for sleeping. But better yet, most of the garden produce has been gathered and in the fruit cellar or freezer waiting to be consumed this winter. The colors on the trees are a feast for the eyes...God has His paint brush loaded with some brilliant colors. Gratitude is the word I like the best for this time of year...God has once again blessed us abundantly.
I made a few cards to reflect those thoughts.

For this card, I used the Huntington paper and the Always Grateful stamp set. I did some 1st, 2nd and 3rd generation stamping with the tree and came up with the depth that I was looking for. It doesn't show up on the picture as well as on the card though. Two self adhesive Durables Artisan Studs finish off the card. I like the very minimal but great masculine feel to the card.

This second card I did for Thanksgiving uses the same stamp set for the tree. I used the puddle pad technique for the tree. This is the way that many of the trees in my area look now and I love the color and splendour they are displaying. I am so thankful for that burst of color before the drabness and whiteness of winter settles in. I used an ombre look on the side of the card by tearing strips of cardstock and layering them. I finished the card off with a few brown sparkles and some natural hemp.

For this card I used the same technique with the ombre cardstock only placed them in opposite order. I used black hemp and few Just Blooms as well as some more of the brown sparkles. The banner is made using the Keyboard Uppercase stamp set.
Your next stop on the Braer's Team Hop is Carol of "Crafty Carol's". I am sure that she will, as usual, have some fabulous artwork to share with you.
If you get lost along the way, you can head to Brae Montgomery's blog http://thebrae-er.blogspot.ca/2013/10/october-team-blog-hop-thankful-for-so, as she has the complete blog list.
Thanks for hopping along with us - we hope we were able to inspire you to get creative using some of the designs, products and techniques seen along the way. Join us again in November when we will be featuring gifts to make for the Holidays .
Enjoy your Thanksgiving holiday. I for one plan to and I am so thankful for living in a country like Canada where we can celebrate in such freedom!!
Lucy :)
Sunday, September 1, 2013
Brae-er Team Blog Hop - Cricut Inspired
Welcome to the Brae-er's September Blog Hop. This hop is circular in nature, so if you started here, welcome. If you came from Rosalynd's blog and saw her great art then you are in the right place. This month we are featuring projects that are cricut inspired. CTMH came out with another Cricut cartridge in July called ArtBooking and I absolutely love it. I had so much fun playing with it and creating this mini album that you are about to see. I do not have any pictures in it yet...have to get them printed in different sizes that I currently have...so you just have to use your imagination. I will warn you that this post is very picture heavy. Have fun looking what my imagination came up with. Everything in this album except the picture mats is cut with the Cricut ArtBooking cartridge (set at 6") with the exception of some of the pink snowflakes. They are cut with the Art Philosophy cartridge. The album itself is made with the Frosted paper pack and a sheet of Cotton Candy cardstock and Cocoa cardstock, some small flourishes, bitty pearls, bitty sparkles and rhinestone clusters from the new rosewood mini medley collection.


Front Cover

Inside Front Cover
Pink Overlay is from Art Philosophy.

Room for 3 little photos. Snowflakes are from the overlay in a later page. I love that you can use them for other parts of the project.

Room for 1 photo. I used liquid applique to puff up the word SNOW.

Overlay for a photo. Snowflake is one of the crocheted flowers CTMH carries.

Room for an oval photo.

Room for two 1.5 x 2" photos.

Envelope for storing memorabilia.

Filmstrips hold lots of little photos or 2 long narrow ones.

Pocket that holds 3 tags - great for more pictures or for lots of journaling!

Overlay and paper hinges to 'hide' the picture and to show the snowflake effect over the picture.

Three 3" flip flaps to hold more pictures.

Page for journaling or more pictures. The flip side is exactly the same but for the pattern on the paper.

Inside back cover.
These are just some of the pages. There are 21 pages in total, but some of them I left very plain so that the pictures would take the show. I do not have any pictures developed yet as I said earlier, so I did not include those pages.
I hope that you have enjoyed my mini album. Please leave any comments that you may have...I would love to hear from you.
Now it is time to go on to the next blog in this blog hop. And that blog belongs to Tamara. Go and check out her wonderful artwork. Thanks for stopping by!
Enjoy your day and your long weekend, Lucy :)
Thursday, August 1, 2013
Ombre Technique
Do you like the look of liquid glass and a rainbow of color? Check out this video and see just how simple it is to use this technique. I love it and will use it in one of my upcoming projects.
Enjoy the video and have a wonderful day.
Lucy :)
Enjoy the video and have a wonderful day.
Lucy :)
Friday, June 21, 2013
Summer Has Arrived
Today is the first day of summer and with it comes lots of thoughts of picnics, family reunions, holidays and relaxation for most people. This is a circular blog hop with the Brae-ers so if you just came from Cheryl Peyton's blog at http://peytonspaperplace.blogspot.com/2013/06/summer-fun-welcome-to-this-months-blog.html you are in the right place.
Going on a picnic one thing that I love to do but never seem to be able to do much of. We are in our busiest season as far as work goes, and with that comes many packed lunches. So in light of that I thought I would do a project that would help me to pack a picnic lunch so much easier, especially for Canada Day.


I do not have the special Canadian military stamp set yet so I had to make do with getting a Canada flag from the internet.
The clear pillow boxes were the starting point for this project. I wrapped some ribbon around them and then used a mini clothespin to fasten the Canadian flag and the little banner. Find some red and white napkins and some plastic cutlery and my project was complete. This came together in 15 minutes for me - one of the fastest projects I have ever done. I hope you like it and that it is a springboard for some picnics of your own.

Have a great day, Lucy :)
Going on a picnic one thing that I love to do but never seem to be able to do much of. We are in our busiest season as far as work goes, and with that comes many packed lunches. So in light of that I thought I would do a project that would help me to pack a picnic lunch so much easier, especially for Canada Day.


I do not have the special Canadian military stamp set yet so I had to make do with getting a Canada flag from the internet.
The clear pillow boxes were the starting point for this project. I wrapped some ribbon around them and then used a mini clothespin to fasten the Canadian flag and the little banner. Find some red and white napkins and some plastic cutlery and my project was complete. This came together in 15 minutes for me - one of the fastest projects I have ever done. I hope you like it and that it is a springboard for some picnics of your own.

Now it is time to see what Michelle at http://therighthugh.blogspot.com/2013/06/blog-hop-summer-fun.html has created, Enjoy the rest of the blog hop!
Have a great day, Lucy :)
Monday, May 20, 2013
The Brae-er's May Blog Hop
This month is an exciting one for me. I love Pinterest and it has some pretty amazing things on there. This month the Brae-er's team is doing a Pinterest inspired hop. If you are coming from Heather's blog then you are at the right place. This is a circular blog hop so you can keep going following all the wonderful work that our team is showing you this month. If you get lost, you can go to Brae's blog for a complete list of all the participants. Have fun and enjoy!!

This scrapbook layout is one that I spotted several months ago and wanted to do a layout that was inspired by it. Thanks Jules, for the inspiration!


This scrapbook layout is one that I spotted several months ago and wanted to do a layout that was inspired by it. Thanks Jules, for the inspiration!

So this is my version of that layout. It took me longer to do than I anticipated but the finished page was so worth it.

A closer view of the flower clusters. I used lots of foam tape to give the flowers more depth and dimension. (It is a little hard to see on this picture though.)
Materials used in this layout are totally CTMH, even the thread used on the edges of the layout. I used black embroidery floss. But first I used our great distressing tool to rough up the edges. This tool made it so easy to make these rough edges.(Be prepared for a mess on your clothing when you do this). Making the space for the photo was somewhat more challenging than I thought it would be but I was pleased with the end result. I also used the Girl's Rock stamp set for the flowers. The script scattered throughout the layout is from Universal Backgrounds and Distressed Backgrounds. Leafy stems throughout the layout are cut from the Art Philosophy Cricut Cartridge. Other product used in this layout include mini medley accents, chevron ribbon, small clear flourishes and canvas shapes.
The next stop in this hop is Tamara's. Go and see what she has created for us this month. I am sure that you will enjoy her artwork. As usual, we hope that you will take the time to leave comments on our posts, as we love to get feedback from our viewers....whether it was something that you really liked or some new technique that was used that you would like to learn how to do....by leaving us comments, we get to hear what you like, and what you want to see. Thank you… be sure to come and visit again next month when we will feature summer themed projects.
Have a wonderful day!!
Lucy :)
Tuesday, April 23, 2013
Scrapping with For Always Fabric
Welcome to the Brae-er's Blog Hop featuring favourite techniques. We hope that you will take the time to leave comments on our posts, as we love to get feedback from our viewers....whether it was something that you really liked or some new technique that was used that you would like to learn how to do....by leaving us comments, we get to hear what you like, and what you want to see. Thank you… now on to our hop!
If you have just hopped onto my blog, you can start here as this is a circular hop, but if you get lost you can find your way but going to Brae's blog at http://thebrae-er.blogspot.com for a full list of participants. If you came from Alyson's blog then you are in the right place! This month I have chosen to work with the beautiful fabric that co-ordinates with the 'For Always' paper pack. In addition to that I have also included the ever popular flipflaps.

Picture 1
This layout uses 3 12" flipflaps...the 4x12", the 6x12" and the 8x12". To give this layout some stability I attached all the flipflaps to the inside back side of the main page protector.

Picture 2
(Sorry this picture is crooked)
I added fabric to the bottoms of the 6"and 8" flip flaps. To do this I stitched a running stitch along the top of a folded 2.5" piece of fabric cut the long length of the fabric pieces. I then gathered the fabric with a running stitch, giving it a ruffled look. I attached the ruffles to the flipflaps using the strongest glue dots I could find. (Picture 2)

Picture 3
To keep it looking neat and tidy I adhered a strip of black glitter paper to the back side over the ruffle. (Picture 3)

Picture 4
The use of the small flipflaps (3x4") allowed me to add 6 more pictures without a whole lot of extra bulk.

Picture 5
The same was done for the ruffle of black For Always fabric as on picture 2.

Picture 6
For the last page of the layout (the full 12" page) I took a piece of 12" white daisy paper and wrapped it with the white print fabric and adhered it at the back of the page. That was the easy part. To make pictures and paper stick to the fabric, I found that I had to use glue dots. So as a result the page is more simple in nature except for the Cricut Artiste cut flowers and fussy cut leaves and flowers from the For Always paper pack placed on the journalling tag. (Picture 7)

Picture 7
I had a lot of fun putting this layout together and I am pleased how it has all come together. I hope that you enjoy it too. My daughter had graduated from Grade 8. That is almost 4 years ago now; she will be graduating from Grade 12 in a couple months. Time goes by so quickly. I am just glad to have this done before the next big milestone in her life.
Now it is time for you to go to our next stop in our blog hop and see the fabulous art Cheryl of peytonspaperplace has created for us. Thanks for hopping along with us - we hope we were able to inspire you to create your own projects using some of the techniques that you have seen along the way. Join us again in next month when we will be featuring pinterest inspired ideas.
Have a great day and enjoy looking through the rest of the stops in this blog hop.
Lucy :)
Monday, April 8, 2013
Be Still... and Girls Rock Card
This is a card that I really had fun with. The inspiration came from Splitcoast Stampers. The card format is completely CASed from that site. I love the way it turned out. Better than I envisioned that it would.


I hope you enjoy the card. The sentiment 'Be Still and Know that I am GOD' comes from Psalm 46:10 and has been a favourite verse of mine for a long time. I was so happy when I saw it in the new Spring/Summer Idea Book. If you like it too and would like to own the stamp set please let me know and I will order it for you or you can go here and order it yourself.
Have yourself a great day and take some time to be... be still and know that HE is God!
Lucy :)

The paper is from CTMH's Claire paper pack. The flowers come from the stamp set Girls Rock and I used Cranberry, Sunset, Hollyhock, Cotton Candy, Blush, Topiary, and Outdoor Denim inks to create the flowers. The glitter is stardust glitter glitz.


I used the Girls Rock stamps and Champagne ink, first and second generation stamping to create the background flowers on the two pieces of the card.

I hope you enjoy the card. The sentiment 'Be Still and Know that I am GOD' comes from Psalm 46:10 and has been a favourite verse of mine for a long time. I was so happy when I saw it in the new Spring/Summer Idea Book. If you like it too and would like to own the stamp set please let me know and I will order it for you or you can go here and order it yourself.
Have yourself a great day and take some time to be... be still and know that HE is God!
Lucy :)
Saturday, March 30, 2013
For Always...Again and Again
When I saw the zip strip on the first sheet of paper in the For Always paper pack I knew I wanted to incorporate it into a layout speaking to the love I have for Glenn. The saying on it spoke to me very strongly. It says this: "Everyone says you only fall in love once, but that's not true, because every time I see you, I fall in love all over again." This is the layout that I came up with.


The heart on this layout is something that I thought would be rather unique. I made a rosette, and then cut a heart out of paper and traced it to the back side of the rosette. Using scissors and some patience I cut the rosette into a heart shape. Clear sparkle flourishes and black glitter paper finish the cluster of embellishments on this page.

Another zip strip is used on the left side and it is hard to see but there are bitty sparkles adorning every other dot of the strip.
Once again the process in making this layout was the most fun...trying to bring two separate layout sketches from the Reflections book together to make one cohesive layout (it is available for purchase again and I am so happy about that). I think it worked and I am pretty happy with the end result. I hope you enjoy it too.
Have a wonderful day, Lucy :)
Monday, March 25, 2013
Chantilly - Wonderful Fabulous You
Welcome to this blog hop for the Brae-er's team. I am excited to be a part of this talented team. In this hop we are featuring something made with new product in the Spring/Summer Idea Book. We hope that you will take the time to leave comments on our posts, as we love to get feedback from our viewers....whether it was something that you really liked or some new technique that was used that you would like to learn how to do....by leaving us comments, we get to hear what you like, and what you want to see. Thank you… now on to our hop!
If you have just hopped onto my blog, you can start here as this is a circular hop, but if you get lost you can find your way but going to Brae's blog at http://thebrae-er.blogspot.com for a full list of participants. If you came from Karen Sutor's blog then you are in the right place!
I fell in love with the Chantilly paper pack featured in the Spring/Summer Idea Book and I knew right away what I wanted to do with that paper. While I found the first paper in the pack to be rather busy, I knew that by doing some fussy cutting I could make it fit the vision I had for it in my head. It took some patience to cut out the pieces (did that while watching some TV with my family) and came away very relaxed for the evening. I then used liquid glass and glitter on some of the flowers and on the birds wings, adding some bling to the layout in that way. I popped up quite a few of the parts and that adds lots of dimension to the layout.
'Frugal' is what you could call me when it came to the green paper on the layout. I cut a 9" x 9" square out of the centre of the paper, and then matted it with the creme brulee cardstock included in this paper pack and attached that over the hole in the centre of the green patterned paper. For the circle I made a template using a dinner plate and a bowl, cut that out and folded it into 12 sections. Then I cut the patterned paper pieces, distressed them with champagne ink and attached them to the layout. The picture is originally a 7x5" picture.
I enjoyed the process in making this layout and love the outcome...pretty much what I had envisioned! I hope that you enjoy this layout too. The 'wonderful fabulous you' is me with our only daughter, Jillian, who brings me much joy each and every day. Journalling is yet to be written and will be hidden at the back of the layout.


It is hard to see here but there is a lot of glitter on the flower centres and on the wings or breast of the birds. As well you can kinda see how the layers are popped up.
Your next stop on the hop is Alyson Mayo's blog. Make sure you stop there to see her wonderful artwork!
Thanks for hopping along with us - we hope we were able to inspire you to create your own projects using some of the designs and paper seen along the way. Join us again in next month when we will be featuring various techniques used in our scrapbooking.
Have a great day and I hope you will stop by soon again. Lucy :)
If you have just hopped onto my blog, you can start here as this is a circular hop, but if you get lost you can find your way but going to Brae's blog at http://thebrae-er.blogspot.com for a full list of participants. If you came from Karen Sutor's blog then you are in the right place!
I fell in love with the Chantilly paper pack featured in the Spring/Summer Idea Book and I knew right away what I wanted to do with that paper. While I found the first paper in the pack to be rather busy, I knew that by doing some fussy cutting I could make it fit the vision I had for it in my head. It took some patience to cut out the pieces (did that while watching some TV with my family) and came away very relaxed for the evening. I then used liquid glass and glitter on some of the flowers and on the birds wings, adding some bling to the layout in that way. I popped up quite a few of the parts and that adds lots of dimension to the layout.
'Frugal' is what you could call me when it came to the green paper on the layout. I cut a 9" x 9" square out of the centre of the paper, and then matted it with the creme brulee cardstock included in this paper pack and attached that over the hole in the centre of the green patterned paper. For the circle I made a template using a dinner plate and a bowl, cut that out and folded it into 12 sections. Then I cut the patterned paper pieces, distressed them with champagne ink and attached them to the layout. The picture is originally a 7x5" picture.
I enjoyed the process in making this layout and love the outcome...pretty much what I had envisioned! I hope that you enjoy this layout too. The 'wonderful fabulous you' is me with our only daughter, Jillian, who brings me much joy each and every day. Journalling is yet to be written and will be hidden at the back of the layout.

The layout
Close-up of the top right corner.
It is hard to see here but there is a lot of glitter on the flower centres and on the wings or breast of the birds. As well you can kinda see how the layers are popped up.
Supplies Used:
Chantilly patterned paper,
Creme Brulee cardstock,
Colonial White cardstock,
champagne ink, Creme Brulee pigment ink,
liquid glass, prisma glitter, pop dots,
sentiment from C1533 'Fabulous You' stamp set
If you like what you see here and would like to own some of these products for yourself you can go here and order them from me.
Your next stop on the hop is Alyson Mayo's blog. Make sure you stop there to see her wonderful artwork!
Thanks for hopping along with us - we hope we were able to inspire you to create your own projects using some of the designs and paper seen along the way. Join us again in next month when we will be featuring various techniques used in our scrapbooking.
Have a great day and I hope you will stop by soon again. Lucy :)
Subscribe to:
Posts (Atom)